M1895 Nagant
The M1895 Nagant revolver was designed in the 1890s by Leon Nagant: that's the same Nagant name in the Westernized term "Mosin-Nagant," as he was the inventor of the M91 rifle's interrupter (and other small features). Anyway, he also designed the M1895 Nagant revolver, and it is pretty unique, and, in my opinion, a bit ahead of its time so long as its ammunition isn't taken into consideration. The M1895 was adopted in, as you might imagine, 1895. It was originally a double-action handgun issued to officers in the military, and single-action models were created for infantrymen. The revolver fired the then-new 7.62x38mmR cartridge and had some pretty unique features for its time. Let's take a look at this unique piece of history.
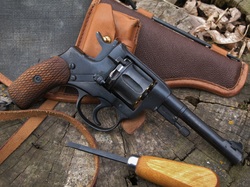
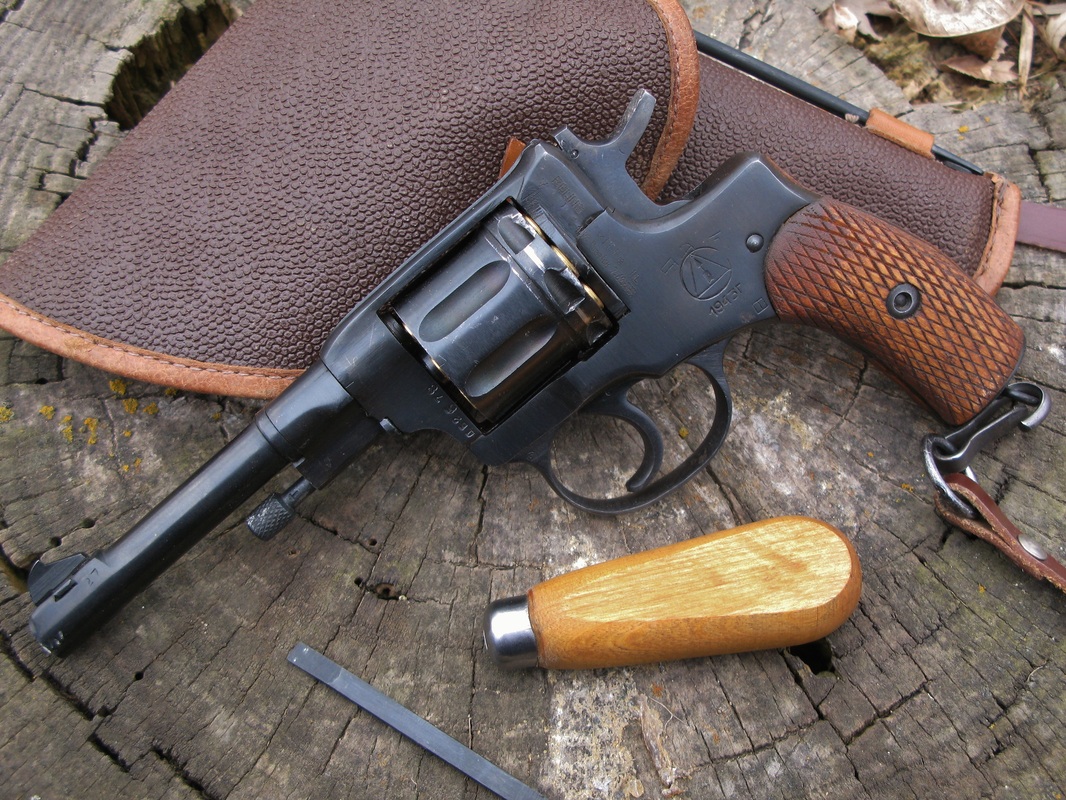
Here we see the M1895 DA/SA revolver, also frequently just called a "Nagant" after its designer (Léon Nagant). As I mentioned, these were originally made as primarily DA/SA revolvers with SAO units being available to non-officers. However, the decision was made around 1918 to change all M1895s into DA/SA revolvers, save for some target models. The particular revolver seen here was made in 1943 at the Izhevsk arsenal, and is, as you might expect, capable of double-action and single-action fire. Whether or not the user is capable of double-action and single-action fire is another story thanks to the DA trigger pull being around 20lbs. on average. Before moving on to the revolver itself, I'd like to take a brief look at the holster you see behind it in the above photo.
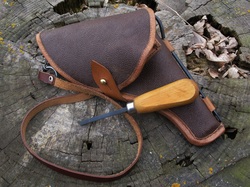
Alright, so here we see the holster. As you can tell, there's nothing all that special about it. This particular holster is a post-WWII model, and it is made out of pigskin leather. You'll also notice that, along with the holster, the revolver's lanyard is visible, as is a little, wooden-handled screwdriver that's used for disassembly of the revolver. We can also see that there is something stuck to the side of the holster, as well, and there appears to be some kind of pouch sewn into the holster underneath its flap. Let's take a look at these different items independently.

So we've done what you'd probably do with a holster first-thing: we've opened it. Since this photo is a bit out of sequence in regards to how we're doing this review compared to how I took the photos, we also see the revolver inserted into the holster. As you can tell, it'd be no difficult task grabbing a hold of its grip to draw. Anyway, here we see that little pouch that we caught a corner of in the previous photo. What's that pouch contain, exactly?
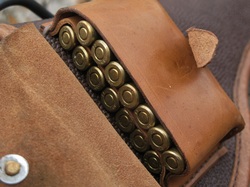
Taking a look into that pouch, now that we've opened it, we'll notice that it serves the purpose of holding your reloads. Since the M1895 can't use speed loaders (we'll get to that shortly), you're stuck with loading single cartridges at a time. You may have also noticed that the pouch contains fourteen extra cartridges. Now, if you're familiar with revolvers, you're probably thinking that that's a bit of a weird number to have there. If you're familiar with this particular revolver, however, it will make more sense. We'll also discuss this later in case you're not sure what I'm referring to here. Anyway, on to another one of the holster's features.

Let's take a look at the other part that is outside of the holster itself. It is a cleaning rod, and it is held in place by two leather loops sewn into the holster. The cleaning rod is pretty basic: there is a loop for the finger and a cut-out for patches. Pretty nifty that it is capable of being carried in the holster, as well, though. Since the holster's top flap is also pretty large, the holster and its contents can be used to disassemble and clean the firearm without having to set any of its parts in unclean conditions: simply rest them on the opened flap.
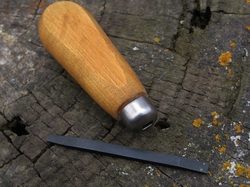
Before moving on to the revolver itself, let's take a look at the last piece of "kit" that came with it. This is the dual-headed screwdriver tool: Since there are two primary screw sizes on the M1895 service revolver, the screwdriver head has had one end sized for either of them. The screwdriver "bit" is held in place simply by friction. To install the bit into the handle, you basically just force it in there until it stops. Worth noting, the holster is not capable of housing this tool. Since a complete break-down of the revolver shouldn't be necessary in the field, there was really no reason to ensure it stayed with the revolver outside of base camp. If you were truly worried about it, though, this tool and its bit could easily fit inside a shirt or pants pocket. Now let's move on to looking at the M1895.
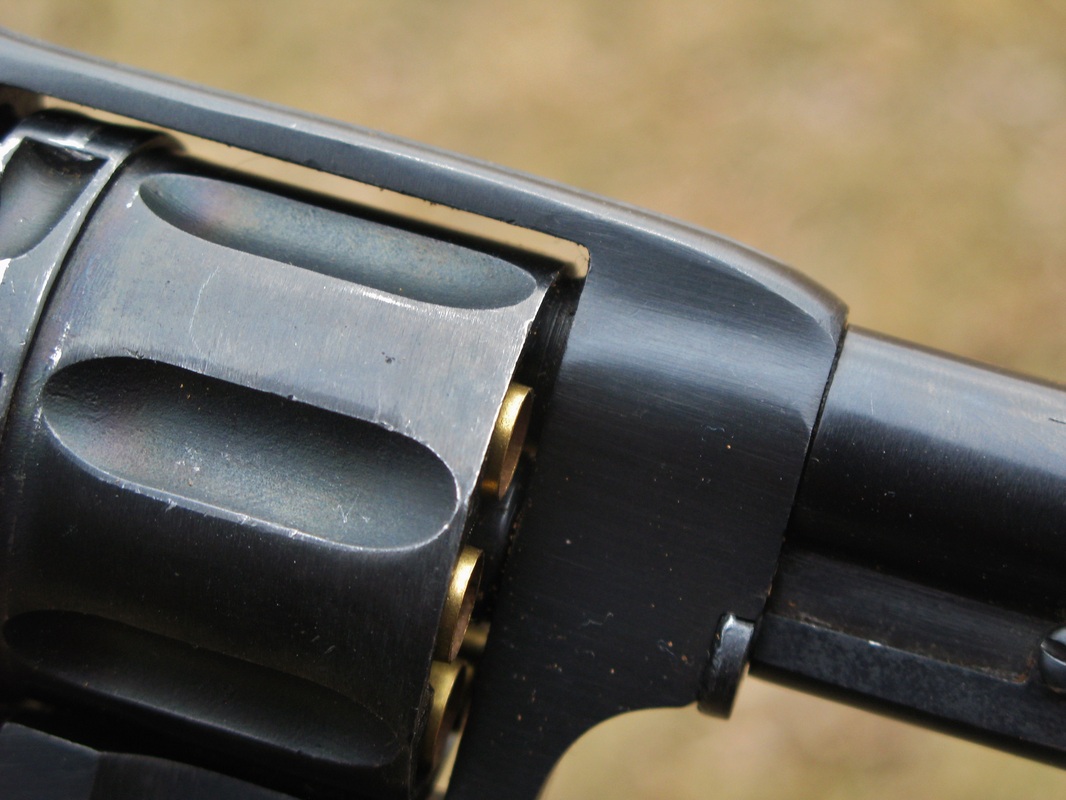
As we can see here, the M1895 that's being reviewed is fully loaded with cartridges. Yes, those are live cartridges and not empty casings: this will be discussed a little bit later. Obviously, handling the revolver, going over its disassembly, and otherwise manipulating the firearm is not going to be a very safe thing to do until it is unloaded. So, first thing's first: let's unload the revolver.
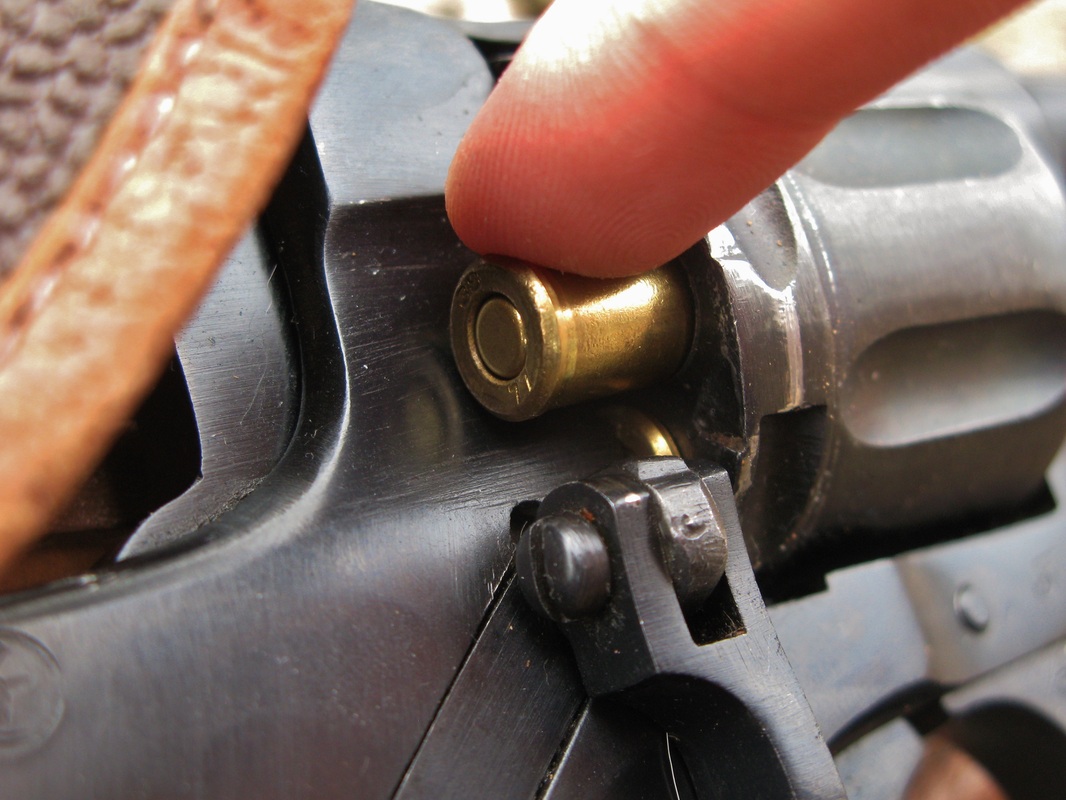
As you can see here, the M1895 uses a loading gate on the cylinder, not at all dissimilar from single-action revolvers (even though the M1895 is a DA/SA). This is why we can't use speed-loaders like mentioned earlier. Anyway, to unload the cylinder of cartridges, you're going to want to rotate this down and out of the way. Let's go ahead and do that, then we'll discuss the two primary ways to unload the revolver.
We will begin the unloading process by flipping the loading gate down, as mentioned. The gate extends down to the same height as the trigger guard. It is worth noting that, while difficult, it would be possible to fire the weapon with the loading gate in this position since the gate does not interact with any other part of the weapon. However, due to its location, the trigger finger is going to be obstructed quite a bit, so you'll definitely know if you've forgotten to rotate the gate back upwards after a reload. Anyway, with the gate down, let's unload the cylinder.
There are two ways to unload the cylinder. There is the "correct" way, and then there is my way, or the "lazy" way. We'll start with my way since it'll probably be easier for you. So, with the gate down, unloading the cylinder is pretty easy. What I've ended up doing to unload the revolver is quite simple: I'll take my index finger and push backwards on the casing. Since the casing extends a few millimeters beyond the cylinder, this rearward push will force the rim back out/away from the rear of the cylinder a few millimeters like you see here.
With the rim no longer pressed against the cylinder, I can do one of two things. I can either go muzzle-up and let gravity take its course on the casing, speeding things up significantly, or I can get my finger pressed against the rim and pull it out of the cylinder manually if muzzle-up isn't quite cutting it. Pretty simple method that spawned from be not being a big fan of the "correct" method of unloading the handgun. Let's cover what the "correct" method is now.
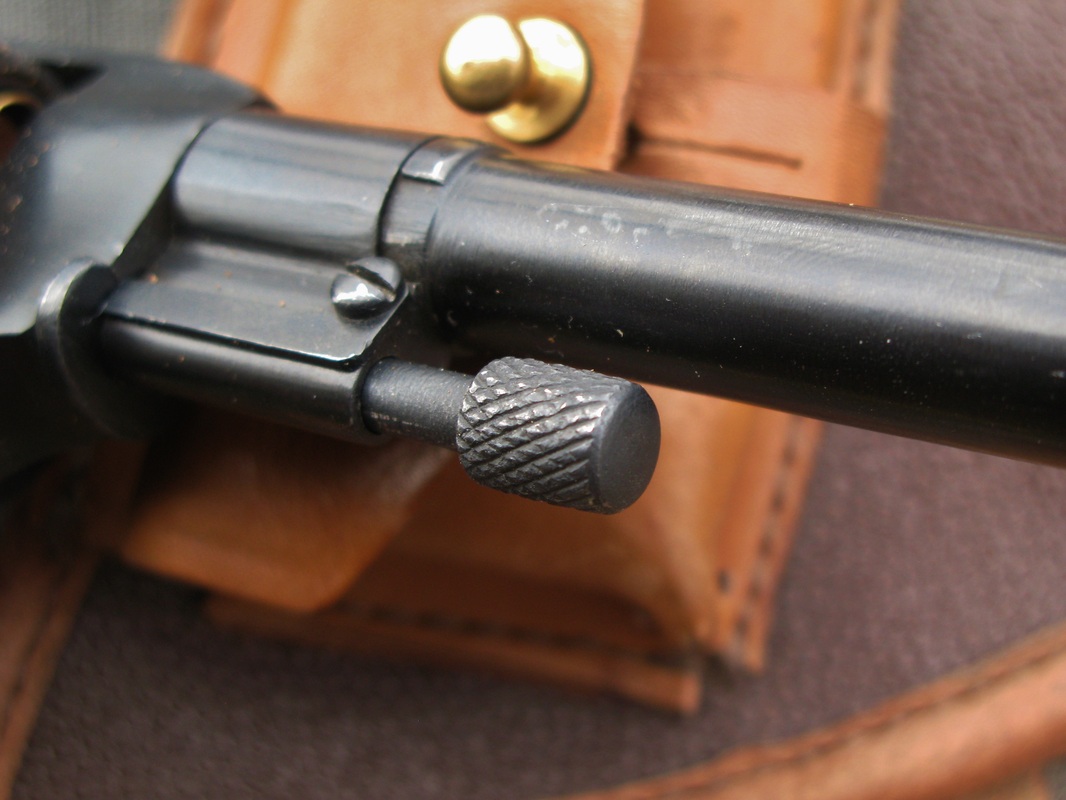
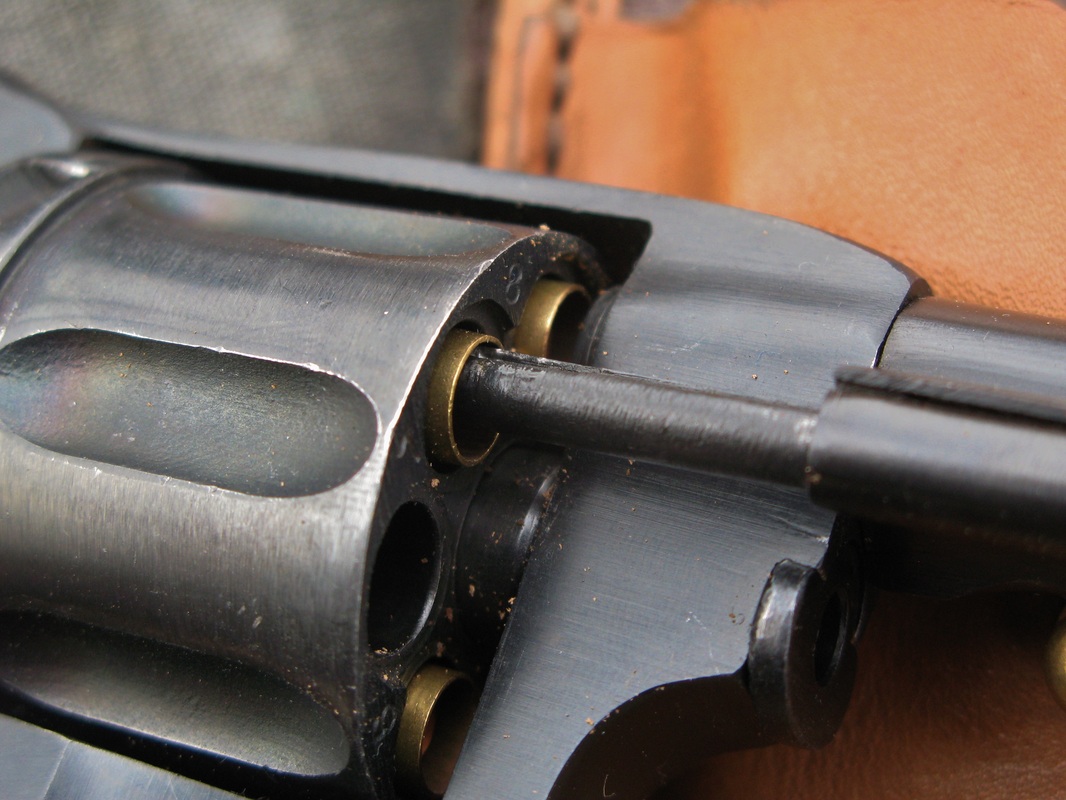
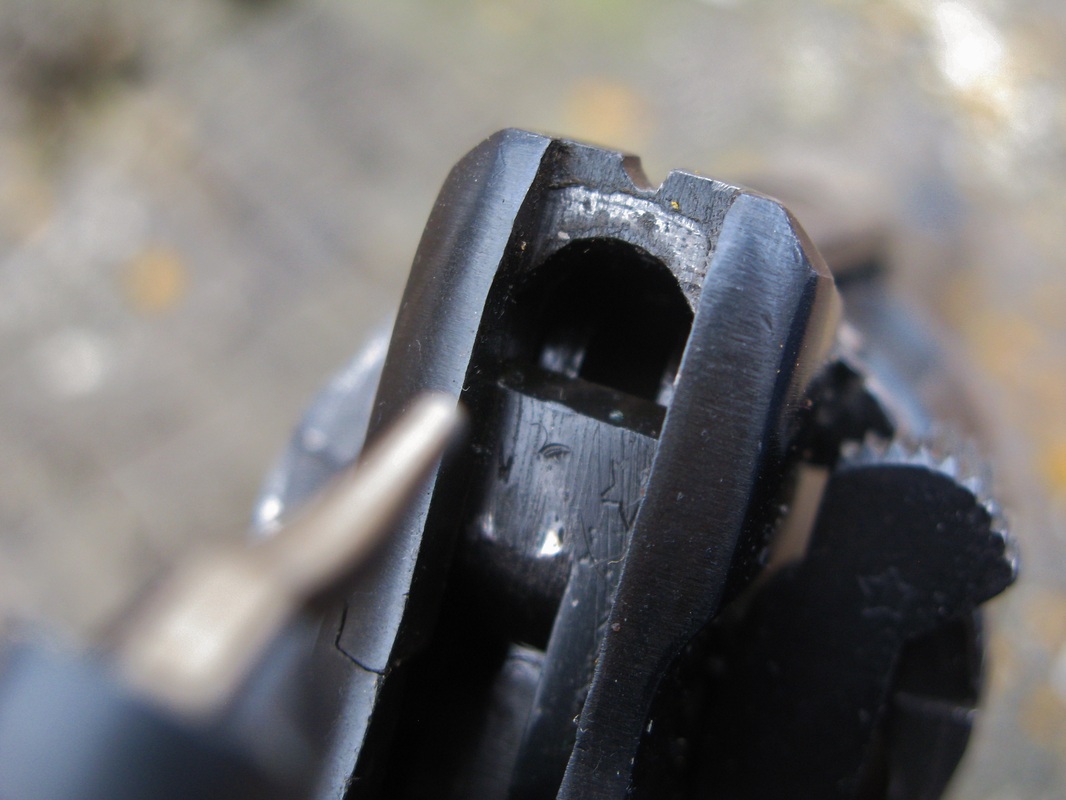
To begin the "correct" method of unloading the revolver, you will need to focus your attention on the piece that appears to be the central axis of the cylinder. While it, indeed, goes through the center of the cylinder, it is not truly its cylinder axis. What is it, then? You'll want to rotate this checkered head of the axis in a clockwise fashion (when viewed from the rear). It will rotate so far, and then it will stop. We're about to see what this part really is.
Once the rotation of the "axis" has stopped, pull out on it completely. It will then look like this underneath the barrel of the weapon. It does not come free of the weapon, but simply stops in this location due to a catch in the pivoting housing it sits in. Let's look at this housing now.
With the "axis" all the way forward, rotate the housing it sits in (between the frame and barrel) out and up to the right as far as it will allow. You will notice that your cylinder axis has now become your ejector rod, revealing its true form.
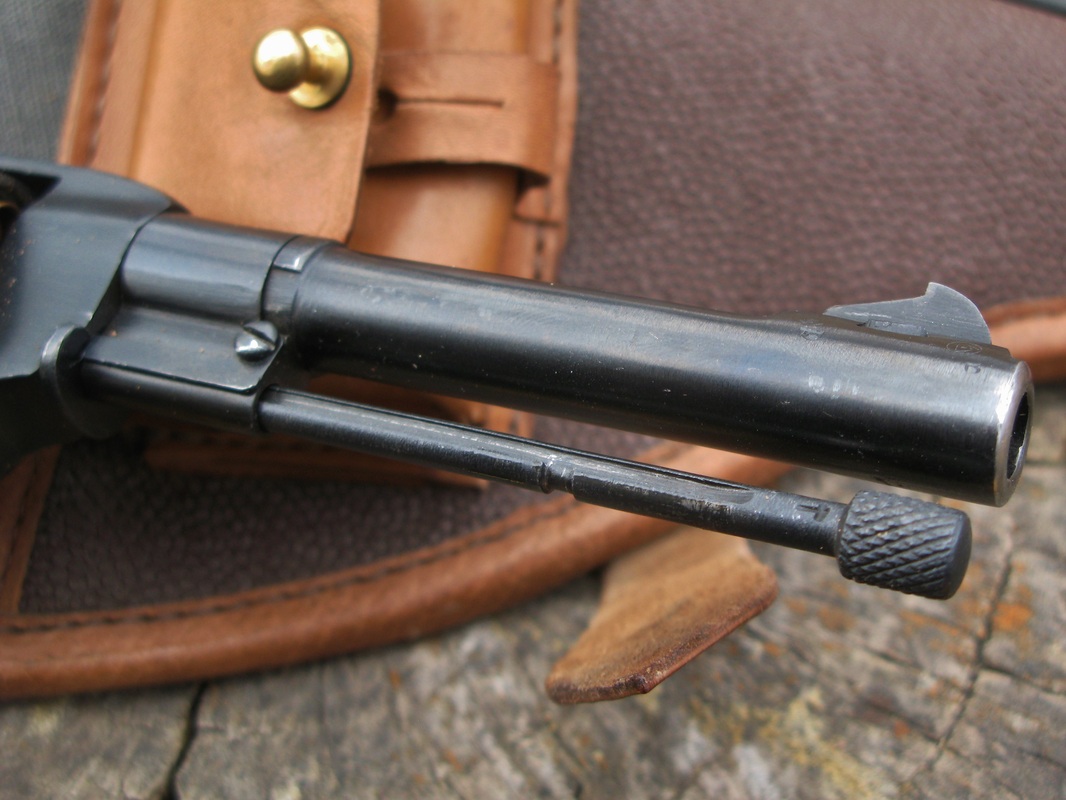
It should be noted that the weapon is perfectly capable of being fired with the rod in this location. Be sure to rotate it back underneath the barrel and press it into the cylinder, though, as recoil could potentially lead to disassembly of the weapon (which we will cover later). Since I tend to be forgetful, I am not that big a fan of the "correct" method.
It should be noted that the weapon is perfectly capable of being fired with the rod in this location. Be sure to rotate it back underneath the barrel and press it into the cylinder, though, as recoil could potentially lead to disassembly of the weapon (which we will cover later). Since I tend to be forgetful, I am not that big a fan of the "correct" method.
Press the ejector rod rearward again towards the cylinder. It should more or less line up with the cartridge in the cylinder. You'll be unloading the revolver like your standard single-action revolver now: press casing out the back, rotate cylinder. It should be worth noting that the cylinder will always be free to rotate clockwise unless the hammer is fully cocked. This means you can have the weapon fully loaded, hammer down, loading gate closed, and the cylinder will still rotate freely clockwise. It's very odd, and a little frustrating at times, but you get used to it. You don't have the choice not to get used to it.
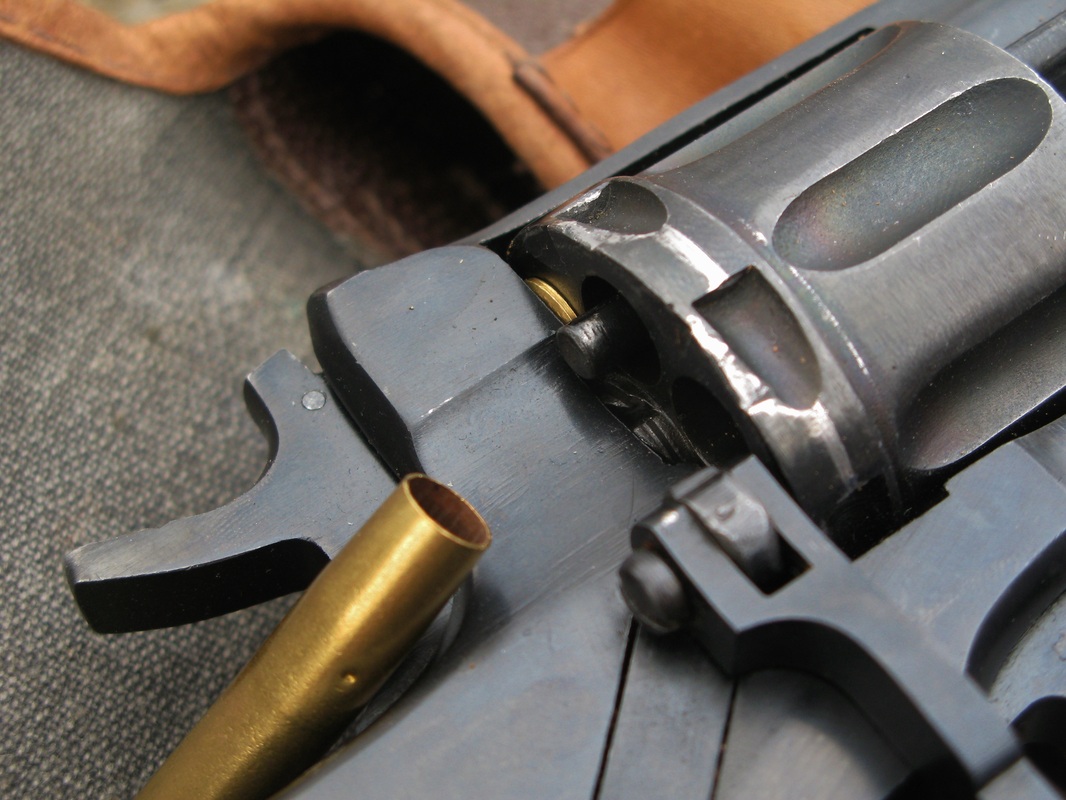
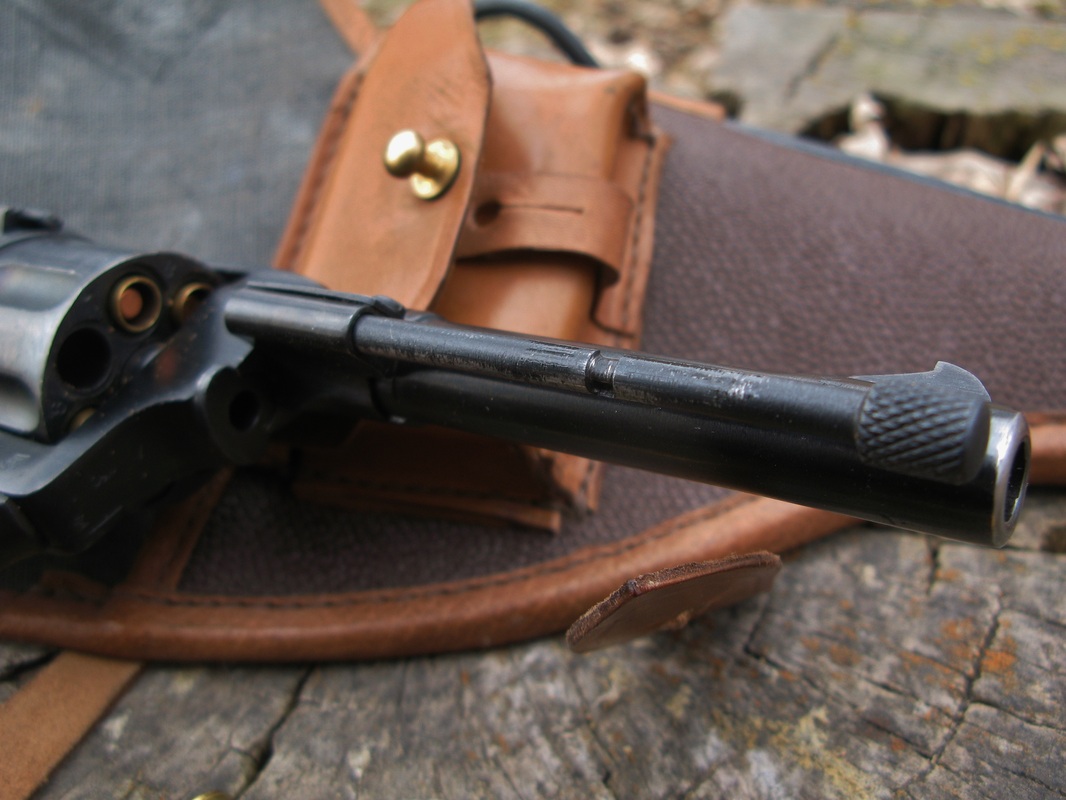
The ejector rod does not come that far out of the cylinder. However, it (or at least this one) has a tendency to "pop," removing the empty casings from the cylinder with no additional input from the user. Again, going muzzle-up will also help with removing the spent cartridge casings from the revolver's cylinder.
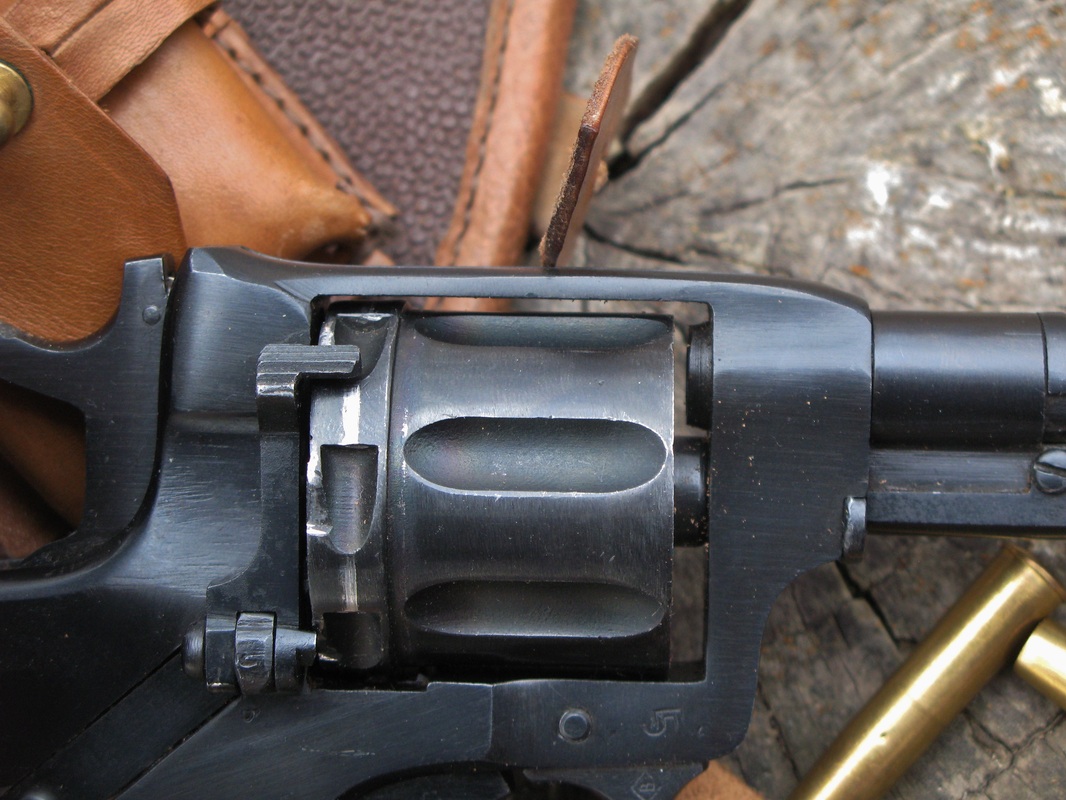
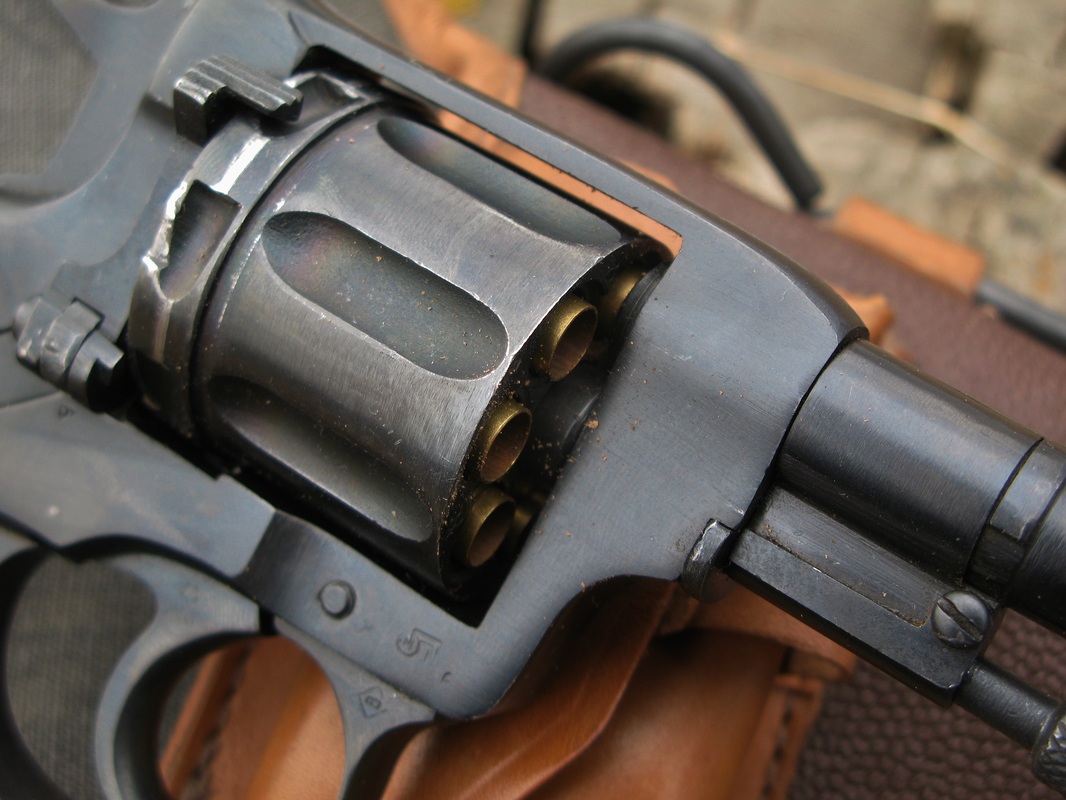
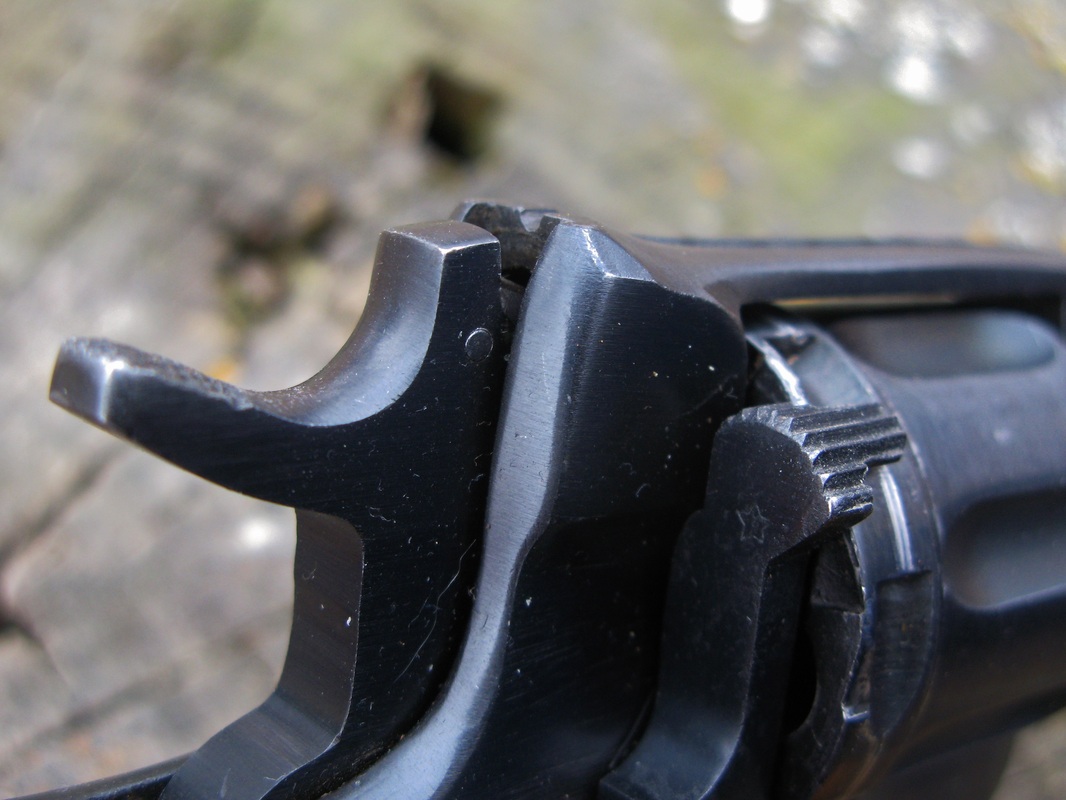
Now, it was mentioned earlier that the cylinder will rotate clockwise freely with the hammer forward. Let's take a look at the cylinder with the hammer forward. As you can see, like any other revolver you've taken a look at, there is a very apparent cylinder gap. This should be no surprise. However, take a look at what happens when the weapon is cocked.
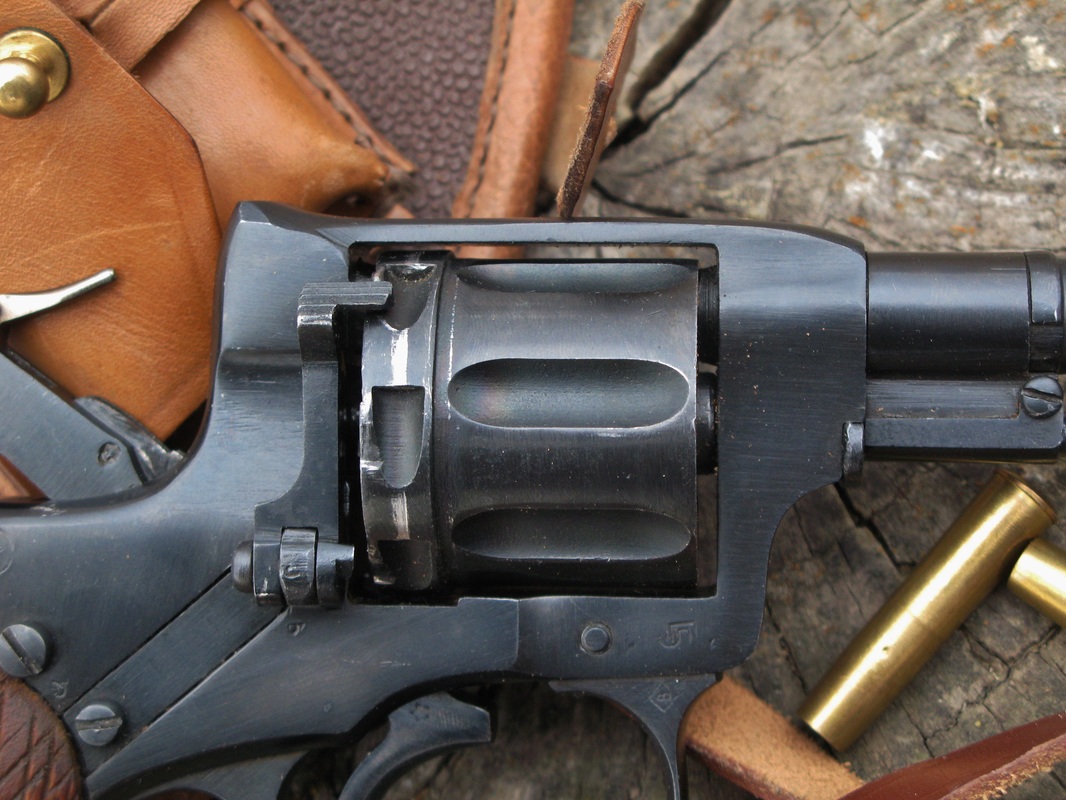
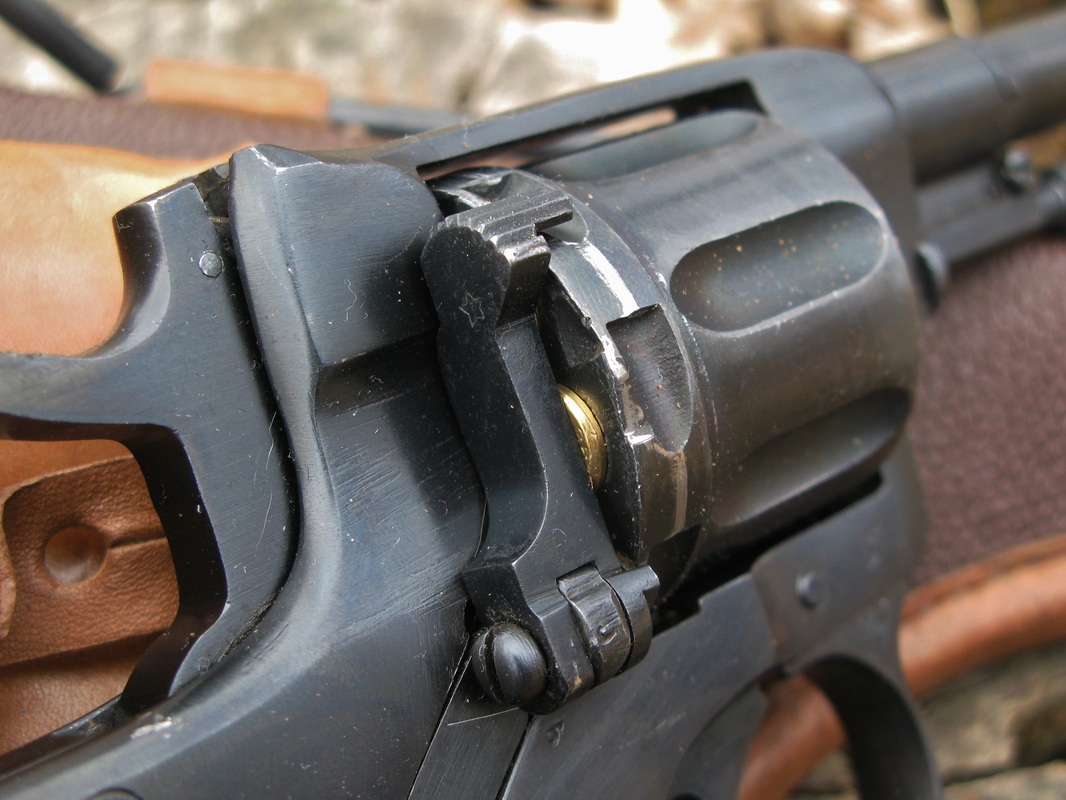
Here we see the revolver once again, but this time with the hammer fully cocked. See the cylinder gap now? Of course you don't. The M1895 revolver has a firing pin shroud that, when the hammer is fully rearward, extends from the rear of the frame towards the cylinder (how it does this will be explained in just a bit). This shroud pushes forward on the spring-loaded cylinder, creating a seal between the cylinder chamber and forcing cone/barrel. Surely a mass-produced, simplistic revolver can't have this perfect gas seal on every single model, though, right? There's probably some machining variances. You're correct, and that's where the ammunition comes into play.
Here we see the cylinder once more, this time with the hammer cocked and ammunition loaded into the chambers. As you may have noticed before, the ammunition actually has its casing extending beyond the front of the cylinder. These aren't spent casings: the bullet for the 7.62x38mmR projectile is actually seated inside the casing. What this does is quite interesting. When the cylinder moves forward upon the hammer being cocked, the round has the front of its casing pressed inside the forcing cone itself. To ensure that this happens, the same shroud that pushes the cylinder forward also contacts the rear of the cartridge to ensure the casing stays seated forward. Once the revolver is fired, the "internal" bullet pushes its way through the casing, fire-forming it. This creates a perfect gas seal upon firing every shot. Since there is no cylinder gap or gas leak upon firing, the M1895 is actually one of the only revolvers in the world that can be properly outfitted with a suppressor (and most certainly was in some instances).

Here's something I found to be quite interesting. Here we see the hammer cocked fully rearward, and my finger is off of the trigger. At this point, we can see a little "block" just below the firing pin channel of the revolver. What happens when I pull the trigger?
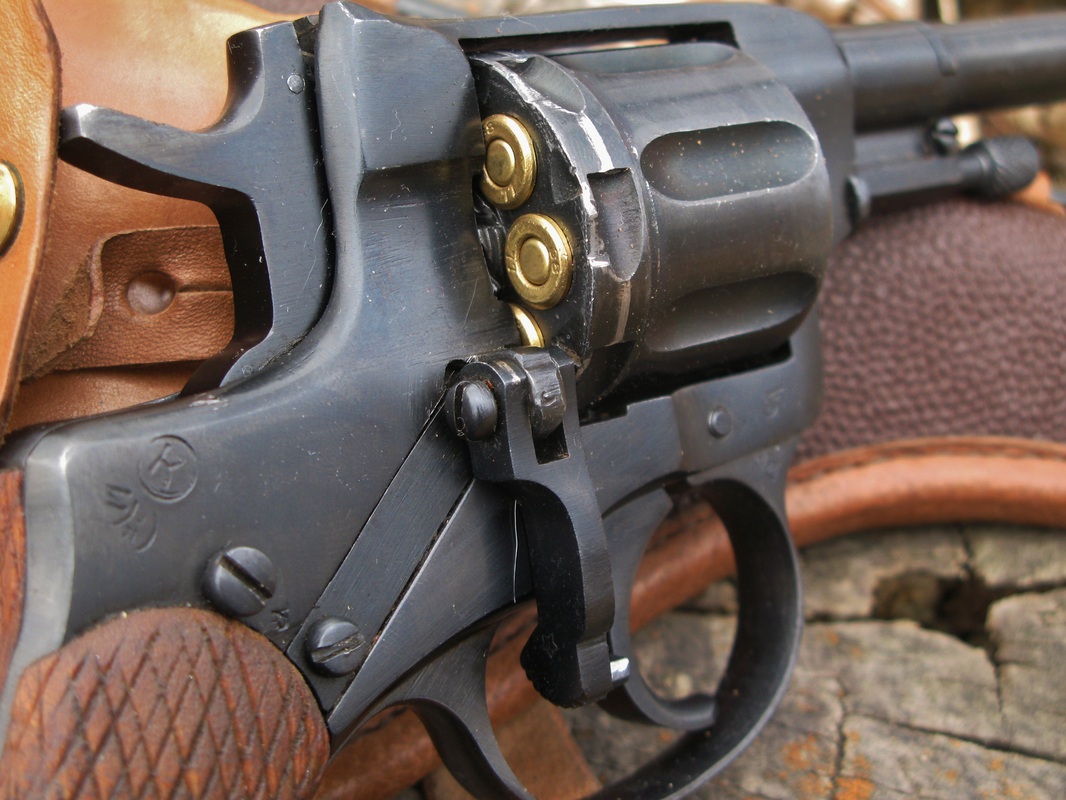
Upon depressing the trigger (and holding the hammer back with my thumb), this bar moves upwards, further towards the firing pin channel. What does it do, though? Remember that piece I mentioned earlier that forces the cylinder forward and also secures the round about to be fired? This bar, when moving upwards, forces that piece forward so that it may perform its tasks. This bar also has another, very interesting function, however.
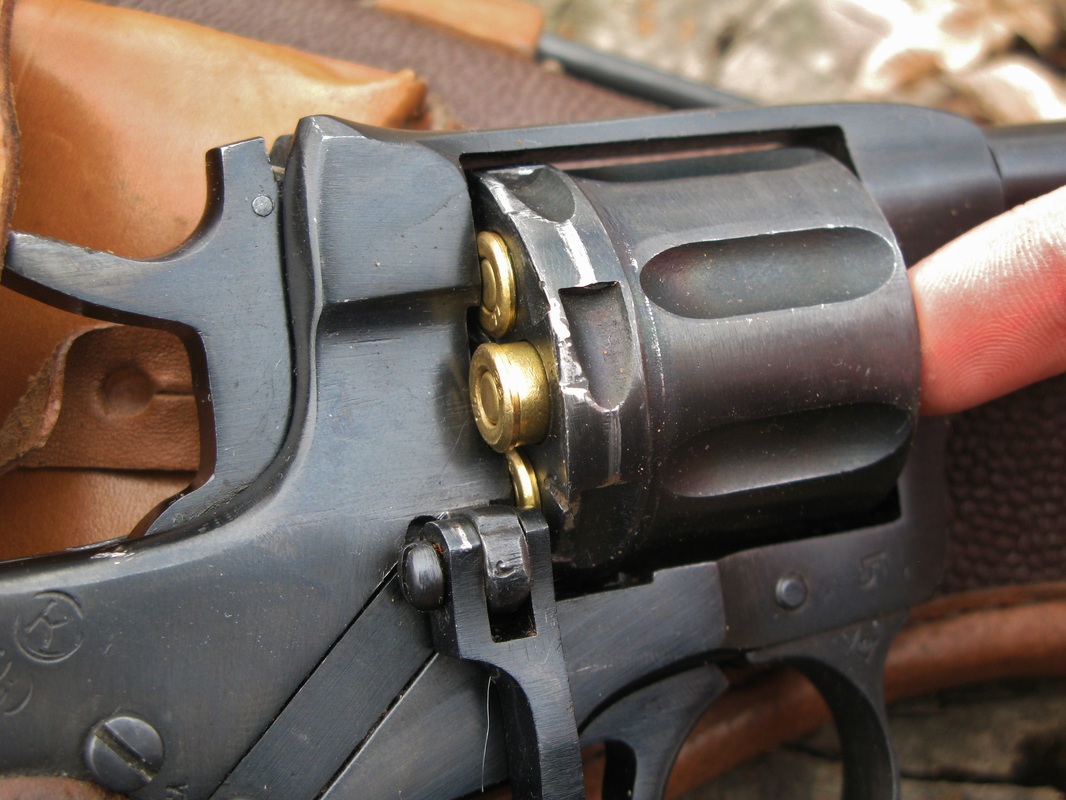
Here we see the hammer forward with my finger off of the trigger. This means that the bar we looked at just recently is in its fully lowered position: the forcing block for the cartridge is fully rearward. You may have also noticed that bar had a cut-out on the lower-left-hand side of it. Things are about to get interesting.
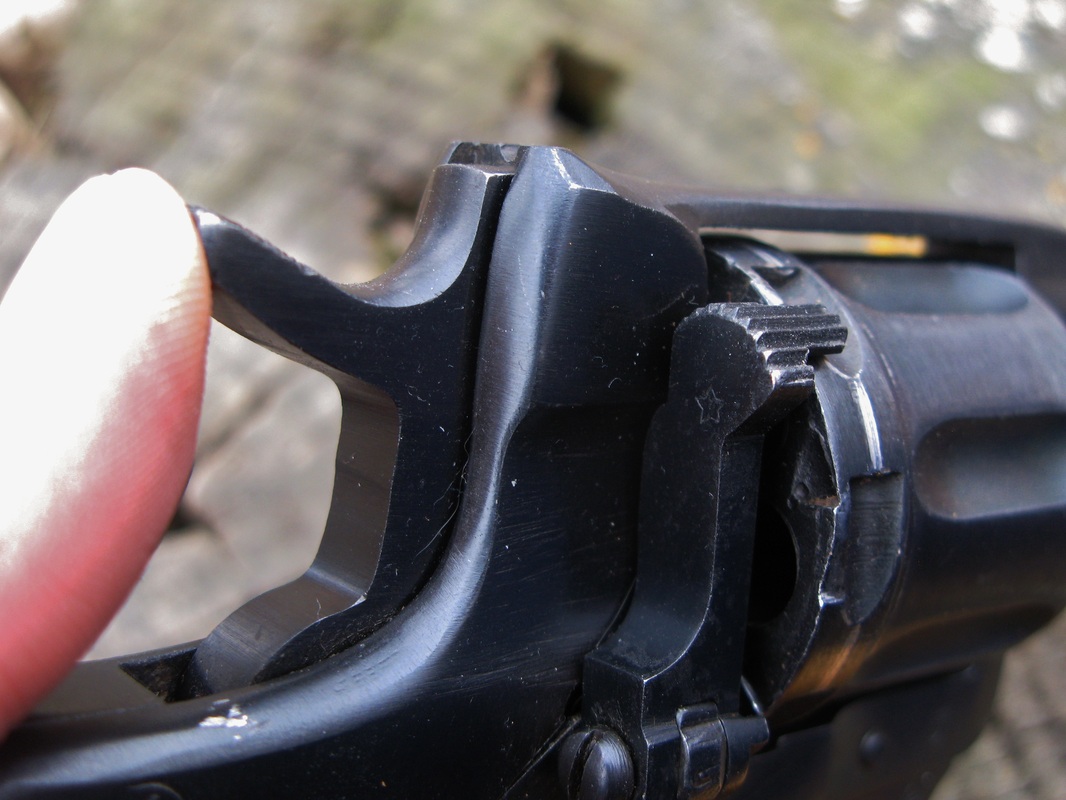
Here is the hammer forward (with the aid of my thumb to overcome spring pressure: it relies on the hammer's forward momentum to fire). Now, obviously, the trigger is being pulled here by my finger. That means that bar is fully upwards. It is pushing the cartridge's "forcing block" forward, and that lower-left cutout on the bar itself is at its highest position. Why is this interesting? The hammer has a part of it that sticks out more than the rest of it in that same location. If the trigger is not pulled, that bar is lowered, blocking the hammer's path. When the trigger is pulled, the hammer can move completely forward, allowing the firing pin to strike the primer. We're basically looking at Ruger's safety transfer bar on a revolver from the 1890s. This means the M1895 revolver can only discharge a round while the trigger is depressed.
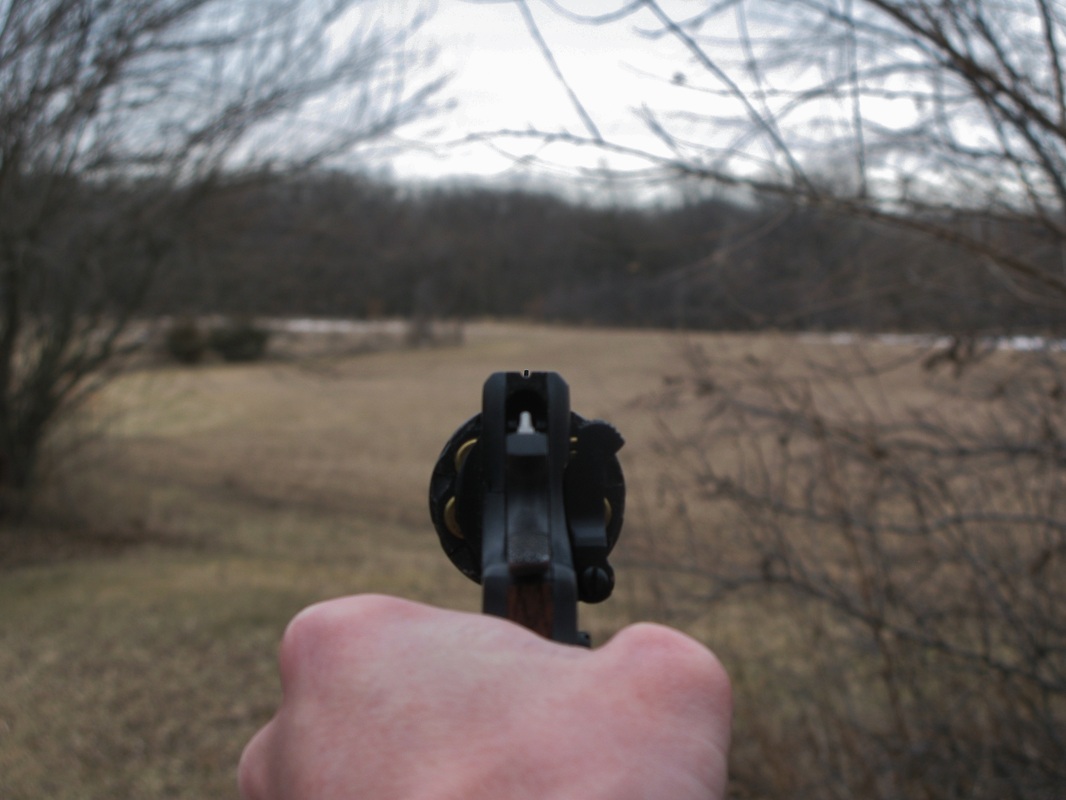
Here is a photo of the sights that turned out well. As you can tell, they are less than stellar, but do not really differ all that much from other revolvers of the time. I have the revolver shown here in single-action with a loaded cylinder. It is worth noting, however, that the sights are also easily visible with the hammer forward. I mean, after all, you can fire it in double-action. Even though you won't hit anything with it in double-action, the sights let you at least try.
That pretty much sums up the M1895. It was used in World War I and also saw use in World War II. For example, as you can tell by the arsenal stamp, this particular revolver was made in 1943 by Izhevsk. Though the TT-33 was to replace the M1895, it was never made in enough numbers during the Great Patriotic War to do so. It was not until the PM came into service in 1951 that the M1895 saw no more use in the Soviet Russian military. However, the revolver continued to see service elsewhere, and is still used today in some instances (some firefighting units ("smokejumpers"), slaughterhouses, railroad security officers).
